
If you want to use a new font in MSWord or just change the font of the operating system to give a different look, you need to first install the font in your operating system. The installation process makes the font available to all the programs in your operating system. Most applications do not allow you to simple load a source file and use it – they provide you with a list of installed fonts for you to choose from. Here are few easy tips to install fonts in Windows.
 </a
</aWarning: Many fonts may slow down your computer
Having too many fonts installed can slow down your computer. Don not worry about installing a large number of fonts for no specific reason – just install the fonts you really want to use. Do not uninstall the fonts provided with the operating system, but feel free to uninstall the fonts you installed after using them.
This slowdown happens with all the operating systems – Windows, Mac OS X and Linux. The operating system needs to keep track of the larger number of fonts, and every program that uses fonts need to load and handle them.
Windows
To install a font in Windows, download it in OpenType (.otf), PostScript Type 1 (.pfb + .pfm), TrueType (.ttf), or TrueType Collection (.ttc) formats. Right-click the downloaded font file and select install. If the font file comes in a file – like a .zip file – extract it first.
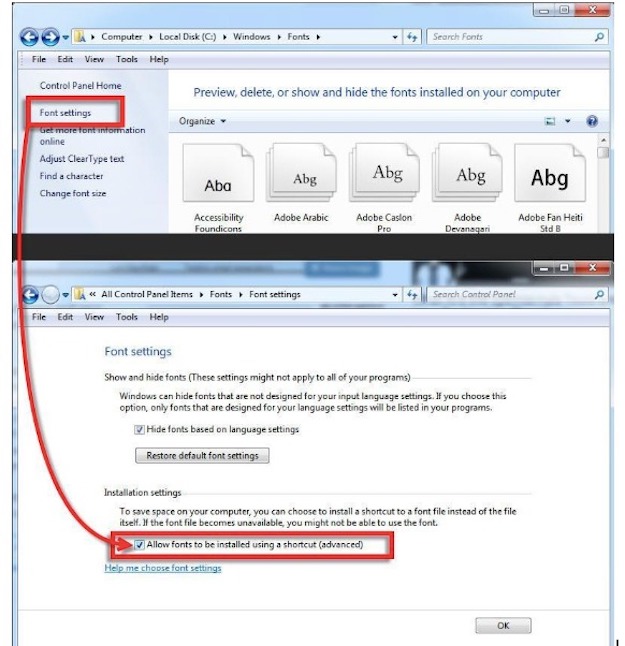
You will find a list of fonts installed in your Fonts folder. Open Control Panel, click Appearance and personalization, and then click Fonts to access it. You can also press the Windows key once to open the Start menu or the Start screen, type “Fonts” to search the system and click the shortcut of the Fonts folder displayed.
From here, you can view your installed fonts. Uninstall a font by right-clicking and selecting Delete. To install multiple fonts at once, drag and drop them into the Fonts window.
How to install fonts in Windows 10
Extract the source from the .zip file, read the .txt file, right-click on the source file and choose Install.
For Windows 7 and Vista
First, you need to extract the sources from the zip files, read the .txt files, and install the .ttf files. Use one of the two methods listed below.
Method 1:
Right-click the font file and choose Install.
Method 2:
You can also access Control Panel, double-click Fonts, and drag the files to the folder.
How to install fonts in Windows XP, XP SP1, XP SP2 and 2000
First, you need to unzip and extract fonts, read .txt files, and install .ttf files. Use Winzip, Winrar or similar to unzip the .zip files you downloaded from us. XP has an internal decompression tool. Extract them to a temporary folder that you can create on your desktop. From this temporary folder, you will drag and drop your source files or navigate to it to install the files.
Method 1:
Go to Start and then to Control Panel. Double-click Fonts. Choose File from the menu bar and then install New Font. In the Add Fonts dialogue box, navigate to the location of the installed fonts and click OK.
Method 2:
You can also access the Control Panel by double-clicking My Computer.
Method 3:
Go to Start, Programs and Accessories, click on Windows Explorer. Double-click the hard disk C. Double –click Windows, and then double-click Fonts. Depending on how many fonts you’ve installed, it may be slow to open. Drop the extracted fonts in the open fonts window. If it comes up and says to uninstall the font, it means that you already have that font or font with the same name installed. Click the font in the Font window and delete the old font or just say OK to forget it. You can drop more than one font in the Font window.
Mac OS X
To install a font in Mac OS X, download OpenType (.otf), TrueType (.ttf), Datafork TrueType Suitcase (.dfont), or an older type of font file compatible with Macs, such as PostScript Type 1. Double-click the downloaded source file to view it. Click install Source in the preview window to install it.
You will find a list of fonts installed in the Font catalog application. Top open it, open the Finder, click Applications in the sidebar, and double-click Fonts catalog. You can also open the Launchpad and click on the Font Catalog shortcut. To start it from the keyboard, press Command + Space to open the Spotlight search, type “Font Book” and press Enter.
Preview a font by clicking on it. To remove a font, right-click it and select Remove Family “Font name”. To disable a font you have installed, right-click it and select disable the font name family. You can re-enable it in the same menu later.
To install multiple font files at once, drag and drop them into the Font Catalog window.
Linux
Different Linux distributors come with different desktop environments, and these different desktop environments contain different applications for this.
To install a font, download it first in TrueType (.ttf), PostScript Type 1 (.pfb + .pfm), or OpenType (.otf) format first. You can double-click the font to view it. In Ubuntu or any other GNOME-based Linux distribution, GNOME Font Viewer will appear. Click the Install button to install the source of your user account.
You can install fonts manually – or install multiple fonts at once – by placing the, in the .fonts directory of your user account. First, open your personal directory in a file manager. In nautilus, click View> Show hidden files to display hidden folders. Locate the .fonts folder and double-click it. If it does not exist, right-click on your directory, create a new folder, and name it as .fonts. Put font files in this directory to install them for your user account.
You will need to refresh the font cache before the fonts placed in this folder are available in the applications. Open a terminal and run the fc-cache command.
To delete a source, open the .fonts folder in your home directory and delete the source files from there. If you added the font to the GNOME Font viewer, navigate to the .local/share/fonts directory in your home folder. Run the FC-cache command later to unregister the system fonts.
If you need to use a very large number of fonts for some reason, you may want to use a font management program. You can load all your sources into a single program to view and manage them in one place. You can use the font management program to install the fonts on your system when you need them and uninstall them when you do not need them, avoiding slowdowns.
