
Did you know? The term “WordPress” is googled in over 2.8 million instances every month? The website receives more unique visitors each month (126 million) than the Amazon e-commerce website (96 million)!
Such is the global popularity of WordPress that since its inception, 36 major versions have been released with a major version being released once in every 152 days! WordPress is currently powering an astounding 75 million websites across the globe, and the latest version 5.2 (released in May 2019) has already been downloaded over 37 million times!
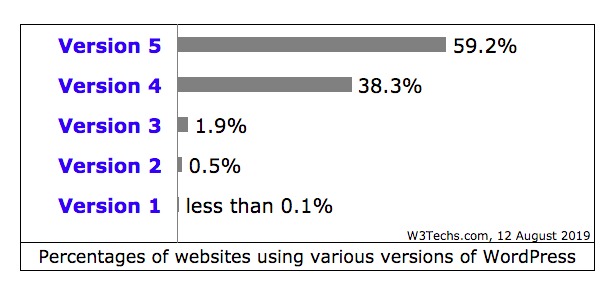
If you are using WordPress to power your professional or business websites, these are some great stats to read about. However, everything is not so rosy! A majority of WordPress websites are still running on older or outdated versions, with only 22% of the websites updated to the latest versions. Released way back in December 2005, the WordPress version 2.0 still powers 0.6% of the WordPress websites (small numbers but still significant considering the number of WordPress websites). Similarly, WordPress version 3.0 (released In November 2010) also powers 2.0% of the WordPress websites.
The typical response of any WordPress website owner is “why bother updating the WordPress version? Does it make any difference?” The answer is “Yes.” Not only is updating your WordPress to a later version free of cost, but it also comes with many benefits for your website such as:
# Protects your website from a variety of malware attacks and online security threats.
# Makes your business or professional website look and function better with added features, bug fixes, and enhancements.
# Saves time spent finding and fixing incompatibility issues between the main WordPress and the installed WordPress plugins and themes.
To learn more, read why your WordPress themes and plugins need to be up-to-date?
If you’re sold on the idea, and are proceeding to try updating to the latest WordPress version, there’s a catch. If you thought a “WordPress update” is just a matter of clicking an “Update” button, it’s not so simple (particularly if you are currently running your WordPress version on an old version like 2.0 or 3.0 and want to update it to the latest 5.x versions).
Neither is any automated tool available that can easily update your WordPress across multiple versions. You will have to do it all manually! However, don’t worry! We are here to guide you through the steps you need to execute for a successful update. So, let’s get started!
However, before we go ahead, here are a few things to consider and precautionary steps to take.
# Opt for an incremental mode of updating multiple times. This means updating your current old WordPress version to the next released version (example, version 3.0 to 4.0) and repeating the process till you update to the latest 5.x version.
# Take a complete backup of your current website data so that if anything goes wrong, you can use your backup data to restore your website. This process can be automated with ease using a WordPress backup plugin.
Now that you are back up ready, let’s now get on with the 4 steps that you need to update your WordPress version manually.
4 Steps To Manually Update Your WordPress Website
As mentioned in the previous section, we recommend that you perform an incremental update on your WordPress versions. Worried about how to gain access to an old version of WordPress? Download them from the official WordPress archive.
Here is a useful tip to quicken the update process – if you are using a WordPress version older than version 3.7, complete all your “incremental updates” till this version and then “directly update” to the latest 5.x version by using the “Update Now” feature available in this version.
Next, take a look at the four basic steps for updating your WordPress version:
1. Deactivate all plugins installed on your WordPress website.
2. Download the latest WordPress version.
3. Remove the currently installed version of WordPress version from your system.
4. Upload the new WordPress version on your web server.
Let’s look at each of these 4 steps in detail.
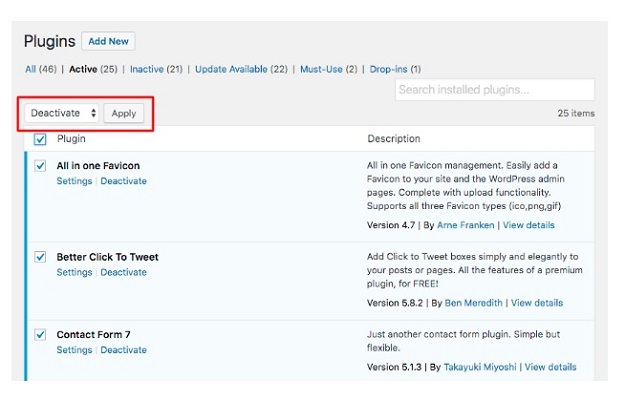
Step 1: Deactivate All WordPress Plugins
Why is this step necessary? As you are using an outdated version of WordPress, you are also likely to be using outdated versions of WordPress plugins. These old plugins will not be compatible with the latest WordPress 5.x versions and may later result in compatibility-related problems that are difficult to identify. Hence, it’s best to deactivate them.
How? Here are two ways you can do that:
# Deactivate all installed plugins from the WordPress Administration panel (if you have admin rights).
# Else, deactivate the plugins by using phpMyAdmin script or by resetting your plugins folder through an FTP client.
Remember that once you are done with the entire update process, you will need to reverse this process and activate the plugins again.
Step 2: Download the Updated WordPress Version
The next step is to download and extract the updated WordPress version from the Download page. As recommended, download the incremental update method. So, if you are currently running your WordPress website on version 2.x, download the next major version that is, 3.x.
Where should you download and store the new WordPress package?
Either to your:
1. A local computer using a browser tool (if you are going to upload and install your WordPress on a remote webserver).
2. Web server if you have shell access rights for your web server and can use console-based tools.
With a console-based web browser, you can download and extract your updated WordPress zip on your current WordPress installation folder (example, “Uploads” folder) and then execute either of the following commands:
# gunzip -c WordPress-Version.tar.gz | tar -xf
# tar -xzvf latest.tar.gz
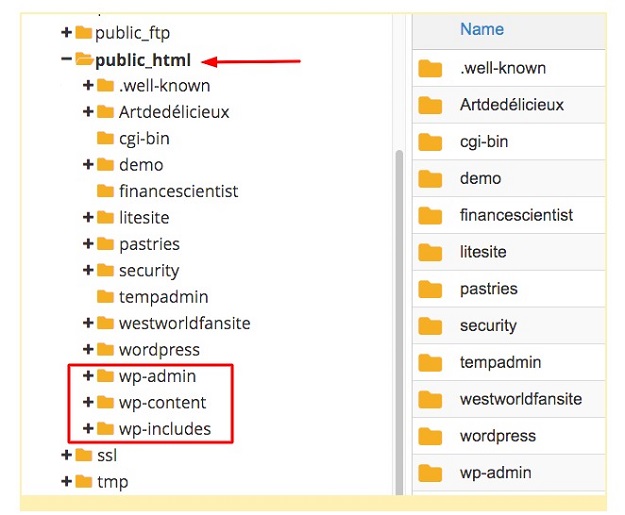
Following the file extraction, the updated WordPress version files are stored in the “wordpress” folder. Ensure that the following files and sub-folders are present in this folder:
# wp-admin, wp-includes, and wp-content folders
# PHP files including index.php, wp-login.php, and wp-config-sample.php
Step 3: Remove the Outdated WordPress Version From Your System
Why is this step necessary? Well, the truth is that any manual upgrade process does not overwrite all the existing files to their latest version. Old files and folders continue to exist in your website folders, which can cause later problems with your website operation.
Having said that, you must take care to remove only some of the existing files and folders and retain some of the others as they are. Here is a checklist of what you should (or not) remove:
# Files and folders that you should not delete:
wp-content folder
wp-config.php file
wp-includes/languages folder (which contains your current WordPress language-related files)
.htaccess file (particularly if you have customized the file).
Any image, plugin, or customized files in the wp-content folder.
# Files and folders that you should delete:
All files prefixed as “wp-*” located in your root WordPress installation folder (except the ones listed in the “Files and folders that you should not delete” section).
Additional installation files like the readme.html, license.txt, xmlrpc.php, and the wp.php.
wp-admin and the wp-includes folders
wp-content/plugins/widgets folder that is added after installing the “Sidebar Widgets” WordPress plugin.
Now that we know which WordPress files and folders to delete or not delete, the next thing to look at is the modes of deleting these old files and folders. Here are two methods:
1. Using an FTP client
You can use the same FTP tool that you used for uploading WordPress files to now delete the old files and folders that you no longer require. As some FTP clients do not allow deletion of WordPress folders containing files, you are recommended to turn off this security setting to allow deletion. An example of an effective FTP tool is FileZilla.
2. Using command-line tools (or SSH)
If you are well-versed with command-line execution, you can use command-line tools to make backup copies of the WordPress files (to be retained) and remove all the other files (including the .htaccess file) from your installation folder. Run the command with cp (for a copy) and rm (for removing) as follows:
$ mkdir backup
cp wp-config.php .htaccess backup
cp -R wp-content backup
rm wp*.php .htaccess license.txt readme.html xmlrpc.php
rm -rf wp-admin wp-includes
cp backup/wp-config.php
After completing this process, you can restore any customized files (example, templates or plugins) from your “backup” folder with the following command:
Example, cp backup/index.php that will restore the index.php file
Step 4: Upload the New WordPress Version on Your Web Server
The final step is to upload your new WordPress package to your web server. This is exactly how it is done when installing the WordPress tool, the first time!
Important: Remember to overwrite the following files and folders in the wp-content folder (that you did not delete)
# Old or outdated WordPress plugin/theme files with their new or updated versions.
# If you have customized the default WordPress theme located in the wp-content/themes/default folder, you will need to review and restore the changes to the upgraded version.
There are multiple ways of uploading WordPress to your web server, including:
# Using an FTP tool like FileZilla
# Uploading to a remote WordPress host
# Using the WordPress Admin pages from your web browser
With this method, you can sign-in to your WordPress admin page at the wp-admin folder. At this stage, WordPress checks and recommends if you need to upgrade your database file also. If yes, you need to run the WordPress upgrade script (as described in the wp-admin/upgrade.php file).
You can manually run the upgrade script by:
# Pointing your browser to this location (example, http://example.com/wp-admin/upgrade.php) if your WordPress is installed in the default root installation folder.
# Pointing your browser to this location (example, http://example.com/blog/wp-admin/upgrade.php) if your WordPress is installed in its sub-folder.
With this step, you have completed your entire WordPress update process across multiple versions. Post-installation, you should remember to check if each of your installed plugins/themes is compatible with the upgraded WordPress version. You can only do that from each of the plugin/theme website pages where you can get all the compatibility-related information.
In the event of any incompatibility, you will need to upgrade your old plugins/themes on your website to their latest version that is compatible with your upgraded WordPress version.
In Conclusion
For any WordPress website owner, upgrading their WordPress across multiple versions can be both challenging and risky. While we hope this guide helps you update your WordPress effectively, we would strongly recommend that you take timely backups of your site. If things go wrong, you can simply restore your site back to normal.
