
Some WordPress dashboard login issues might be challenging, particularly for beginners unfamiliar with various management aspects of a site. Other login problems might be technical as well. But don’t panic—you can regain access to your account relatively easily, including via cPanel. Whether you’ve recently installed WordPress for the first time or run into a post migration issue, some of these pointers will help you worry less and work more. This guide guarantees every user can regain access to the WordPress dashboard and manage their website painlessly—whether that means changing content, updating or installing plugins, or redesigning layouts—promptly and without frustration. These pointers are suitable for users of any skill level.
Prerequisites for Accessing Your WordPress Dashboard
Before you can access your WordPress dashboard through cPanel, there are a few important things you’ll need to have ready. Missing any of these can cause problems or keep you from getting into your site altogether.
1. cPanel Login Details
To begin with, make sure to have the cPanel username and password. You normally receive these from your hosting provider when you create a hosting account. These credentials provide access to the control panel which is where you can manage your website files, databases, and other requisite tools. In case you do not know what your login credentials are, try looking through your hosting welcome email or check your hosting account dashboard.
2. WordPress Admin Username and Password
Once WordPress is all set up on your website, you should have access to an admin login that lets you access your dashboard… Here, you can manage a lot: from posts and pages to themes and plugins. Don’t fret about forgetting your WordPress login because tools like cPanel’s phpMyAdmin or Softaculous are available to help you reset your password and regain access.
3. A Working Domain and Hosting Setup
Your domain name needs to be correctly linked to your hosting server. If your domain isn’t pointing to the right place, the WordPress admin page won’t load, and even cPanel methods might not work right. Double-check your domain’s DNS settings and make sure your hosting account is active.
Having these three things in place will make accessing your WordPress dashboard much easier. If any are missing or set up wrong, you might run into login problems or errors that can be tricky to solve later.
4 Easy Methods to Access Your WordPress Dashboard from cPanel
Accessing your WordPress dashboard doesn’t have to be complicated. Here are three reliable methods you can use through cPanel, each suited for different situations.
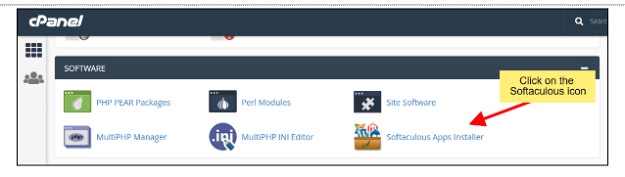
Method 1: Access WordPress via Softaculous Apps Installer (Easiest Way)
If you’re in a hurry and want the simplest method to access your WordPress dashboard via cPanel, Softaculous Apps Installer is the ideal choice. It automates the process with a click, eliminating the need to input URLs or sort through directories.
Step 1: Log in to cPanel
Start by logging into your hosting account’s cPanel. You can usually do this by visiting yourdomain.com/cpanel and entering your cPanel username and password.
Step 2: Open Softaculous Apps Installer
Once inside cPanel, scroll down to the “Software” section and click on “Softaculous Apps Installer”. This tool is used to install and manage applications like WordPress with just a few clicks.
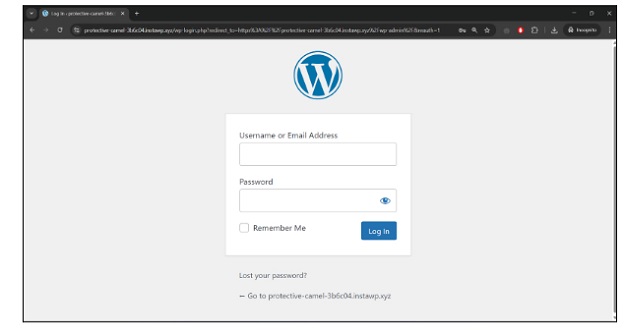
Step 3: Locate Your WordPress Installation
Inside Softaculous, go to the “Installations” tab (often represented by a box or list icon). You’ll see a list of all installed applications. Look for the WordPress installation linked to your domain.
Step 4: Click the “Admin” Button
Next to your listed WordPress installation, you’ll see an “Admin” button. Click it, and you’ll be taken directly to your WordPress dashboard—no need to enter your login credentials again if you’re already authenticated through cPanel.

Pros of This Method
# Fast and convenient – just a couple of clicks.
# No need to remember admin URLs or manually enter credentials (if logged into cPanel).
# User-friendly interface that lists all your installations in one place.
Cons of This Method
# Only works if WordPress was installed via Softaculous.
# If Softaculous isn’t available on your hosting plan, you’ll need to try another method.
Using Softaculous is ideal for beginners or anyone looking to bypass manual steps. It’s the most straightforward way to jump straight into your WordPress admin panel.
Method 2: Manually Enter the WordPress Admin URL
If you’re comfortable with typing a URL and already know your WordPress login credentials, this method is quick and direct. It works well when everything is set up correctly, and no errors are blocking access.
Step 1: Open Your Web Browser
Launch any web browser (like Chrome, Firefox, or Edge) and go to the address bar.
Step 2: Type the Standard WordPress Login URL
Most WordPress sites use the default login URLs:
# yourdomain.com/wp-admin
# or yourdomain.com/wp-login.php
Replace yourdomain.com with your actual website URL. Press Enter to load the page.
Step 3: Enter Your Admin Credentials
Once the login page appears, type your WordPress admin username and password. Click the “Log In” button to access your dashboard.
What to Do If the Login Page Doesn’t Load
If the login page doesn’t appear or throws an error:
# Check your domain – make sure it’s active and pointing to your hosting server.
# Clear your browser cache – outdated cache files may prevent proper loading.
# Try both login URLs – sometimes one works when the other doesn’t.
# Temporarily disable security plugins – if one is blocking login access.
Troubleshooting Common Access Errors
404 Error: This usually means the WordPress site isn’t installed at that location, or the URL is incorrect. Double-check the domain and installation path.
Redirect Loop: This can happen due to misconfigured URLs in wp-config.php or issues with .htaccess. If this occurs, you may need to access the backend via cPanel to fix the configuration.
This method is great if your site is functioning correctly and you just need quick access to the admin area. It’s direct, fast, and doesn’t require logging into cPanel—perfect for day-to-day site management.
Method 3: Using the Direct WordPress Admin URL
This method is very similar to Method 2 but emphasizes accessing your dashboard using the correct admin URL when multiple installations or custom paths are involved. It’s especially useful when WordPress is installed in a subdirectory or a subdomain.
Step 1: Identify Your WordPress Installation Path
Before entering the URL, confirm where WordPress is installed. It could be:
# The main domain: yourdomain.com
# A subdirectory: yourdomain.com/blog
# A subdomain: blog.yourdomain.com
This matters because the admin URL will vary depending on the location.
Step 2: Use the Correct Admin URL
Once you know the path, append /wp-admin or /wp-login.php to it:
# Main domain:
yourdomain.com/wp-admin
or
yourdomain.com/wp-login.php
# Subdirectory:
yourdomain.com/blog/wp-admin
# Subdomain:
blog.yourdomain.com/wp-admi

Step 3: Log In
Enter your WordPress admin username and password, then click the Log In button. You’ll be redirected to the WordPress dashboard if the credentials are correct.
If the Login Page Isn’t Loading
If the URL doesn’t open or shows an error:
# Check the installation path – a common mistake is entering the wrong directory or subdomain.
# Review DNS settings – make sure your domain or subdomain is properly pointed.
# Scan for .htaccess issues – incorrect rules in the .htaccess file can block access.
Common Issues and Fixes
# 403 Forbidden: This may indicate permission problems or firewall restrictions.
# Login redirect loop: Clear browser cookies or edit the siteurl and home values in the database via phpMyAdmin.
# Blank page: Could be a plugin/theme conflict or corrupted core file.
Using the direct admin URL is efficient when you know exactly where WordPress is installed. It bypasses the need for cPanel in many cases and is ideal for regular login, provided there are no configuration issues.
Method 4: Accessing WordPress via MySQL Database (Advanced)
This method is for situations where you’ve lost admin access and can’t reset your password through the usual login screen. Accessing your WordPress database through phpMyAdmin allows you to reset admin credentials directly. While powerful, this method should only be used with caution since it involves editing core user data in the database.
When to Use This Method
# You’ve forgotten your WordPress admin password and password reset emails aren’t working.
# The “Lost your password?” link is broken or inaccessible.
# Admin login is blocked due to misconfigured plugins or themes.
# You need to create a new admin user manually.
Step 1: Log in to cPanel
Head over to your hosting account and log in to cPanel. Look for the “Databases” section.
Step 2: Open phpMyAdmin
Click on phpMyAdmin. This tool gives you direct access to your website’s database. Once opened, you’ll see a list of databases on the left-hand sidebar.
Step 3: Locate the WordPress Database
Identify the database used by your WordPress installation. If you’re not sure which one it is, you can check your wp-config.php file in the File Manager to see the database name defined under DB_NAME.
Step 4: Open the wp_users Table
Click on the WordPress database and find the table named wp_users (the prefix might vary, like wp4x_users).
# Click Browse to see the list of user accounts.
# Find the row with your admin username.
Step 5: Reset the Admin Password
# Click Edit on the row with your admin account.
# In the user_pass field, replace the current value with your new password.
# Important: In the function column next to it, choose MD5 from the dropdown. This encrypts your password properly.
# Click Go to save the changes.
Now you can log in to your WordPress dashboard using the new password you just set.
Security Precautions
Only perform these steps if you know what you’re doing. A small mistake can damage your database.
# Don’t share cPanel or database credentials with anyone untrusted.
# Always use strong passwords and change them immediately after regaining access.
# This method gives you deep access and full control, but it comes with risks. Use it only as a last resort when other login recovery methods fail.
Best Practices for Securing WordPress Dashboard Access
Your website’s WordPress dashboard acts as its nerve center. If left vulnerable, however, your entire site as well as sensitive data might be compromised. Proper security practices, or the lack thereof, can provide peace of mind knowing that your site is secure.
# Set Up Complex and Distinctive Passwords:
Weak and predictable passwords will simply not work! Strive to incorporate various letter cases, numerals, and special characters. If looking after multiple websites and users, obtaining a password manager might be a worthwhile investment.
Enable Two-Factor Authentication (2FA): Bolster the security of your accounts further by enabling 2FA. Identity confirmation is done via an authenticator app such as Google Authenticator or Authy in addition to a password.
# Restrict Login Attempts:
Repeated login attempts define brute-force attacks. Security plugins such as Limit Login Attempts Reloaded and Wordfence allow you to configure the number of login attempts. Setting such restrictions significantly reduces the risk of automated attack systems exploiting accounts.
Maintain Updates for WordPress Core, Plugins and Themes: Perhaps one of the most efficient ways to compromise security is through outdated software. That is why it is best to maintain up-to-date versions of WordPress along with its themes and plugins. If possible, enable automatic updating or check for updates periodically.
# Do Not Use Admin as Default Username:
Please do switch away from using “admin” as your username if that is indeed the case. This is almost always the starting point for numerous attacks. Simply create a new user with admin rights and proceed to delete the old user.
Shift Default Admin Username: A well-known starting point for various hacks, “admin” should not be in use as a username, so switch away from it if you directly use it. You can easily get around this by making a new user with administrator privileges and delete the original account.
# Install Security Plugins:
Focusing on reliable security plugins such as iThemes Security, Wordfence, or Sucuri can do wonders. Threats are mostly malware attacks or unauthorized entry attempts i.e., login attempts, which these plugins can warn or protect against through firewalls.
# Create Regular Backups:
Security breach or technical issues no longer pose a problem as maintaining recent backups alleviates restoration concerns. This can be done through plugins like UpdraftPlus, allowing hosting providers to handle backups or through selected plugins.
A WordPress dashboard doesn’t need securing just once; it’s a continuous effort. Apply these practices to diminish the chances of malicious access to your site which in turn will keep it running securely. Safeguarding the administrator section of a site ensures that the content, users and the brand itself will not be compromised in any way.
Conclusion
Accessing your WordPress dashboard via cPanel is crucial for your website’s uptime maintenance. Regardless if you utilize Softaculous to install or access WordPress, enter the link manually, or if you perform more advanced troubleshooting through phpMyAdmin, each has its purpose depending on the current situation. Understanding these options ensures that you will not be stranded in the case that you lose access.
Just as important as logging in is keeping the dashboard protected from unauthorized access. Remember to set strong passwords, enable two-factor authentication, and update WordPress and its plugins. Knowledge of these access and protection methods enables unfettered site growth devoid of security concern headaches.

